
24 of 233 Squadron’s Dakotas carried paratroopers on 6th June.
This is what happened to the gliders towed by the first six Squadron Dakotas to take-off just before 23:00 on June 5th:
233 Squadron towed six Horsa gliders on D-Day, bound for LZ ‘K’, Toufreville. The glider pilots were from ‘F’ Squadron of the Glider Pilot Regiment, the troops carried were from 8th Battalion of the Parachute Regiment.

Gliders & Tugs:
Chalk # 218 Pilot Lt. A.E.Pickwoad, Second Pilot Sgt. M.Watts
Tug KG414 Pilot W/ Commander Morrison Landed LZ ‘K’
Chalk # 219 Pilot S/Sgt W.Ridgeway, Second Pilot Sgt.P.Foster
Tug KG341 Pilot W/O C.Bailey Landed Off LZ
Chalk # 220 Pilot S/Sgt R.Banks Second Pilot B.Hebblethwaite
Tug KG329 Pilot F/O E.Wood Landed LZ ‘K’
Chalk # 221 Pilot S/Sgt W.England Second Pilot Sgt J.Graham
Tug FZ678 Pilot Flt. Lt. H.J.Barley Landed LZ ‘N’
Chalk # 222 Pilot S/Sgt J.Heron Second Pilot Sgt D.Davidson
Tug KG315 Pilot F/O J.H.Fram Landed LZ ‘N’
Chalk # 223 Pilot S/Sgt L.Weeden Second Pilot Sgt S.Griffiths
Tug KG415 Pilot F/O J.P.Haldimand Landed LZ ‘N’
Note: The majority of the information above is from the excellent history ‘One Night in June’ written by Kevin Shannon & Stephen Wright, Pub. 1994 by Airlife Publishing. It is probably the best work on Operation Tonga from a glider pilots point of view. However, it does admit that the documented allocation of gliders to tugs is ‘presumed’. It seems reasonable to think that Lt Pickwoad’s glider (Chalk 218) would be towed by Wing Commander Morrison in the lead Dakota. However, personal histories state that WO Peter Bailey in the second Dakota, KG341, was towing the glider piloted by S/Sgt Banks and Bailey’s old school friend, Sgt Bryan Hebblethwaite. This was Chalk # 220 and it did land immediately after Pickwoad at Landing Zone ‘K’. This would mean that KG341 wasn’t the tug for Chalk # 219 and that the rest of the match-up of tugs to gliders given above may vary.
Lt. Aubrey Pickwoad was the Officer Commanding 14 Flight of ‘F’ Squadron of the Glider Pilot Regiment (GPR). As was usual with the GPR, the Captains of the other five Horsas were Staff Sergeants and the second pilots were Sergeants. Together, the six gliders were due to transport six jeep & trailer combinations, eight motor cycles, twelve push bikes, explosives, hardware and a group of Royal Engineer sappers under the command of Major Tim Roseveare of the 3rd Parachute Squadron. Their target LZ was ‘K’ near the village of Touffreville.
Pickwoad’s glider carried a jeep, trailer and 3 sappers from 3rd Parachute Squadron RE with their explosives and munitions. As the leading Dakota/ Horsa combination, it was towed by 233 Squadron’s Commanding Officer, W/Commander Morrison is a Dakota that was probably equipped with Rebecca/ Eureka radio navigation equipment. Once the Pathfinders had set-up the battery-powered Eureka beacons on the intended landing zone, the set transmits on a secondary frequency when interrogated by the approaching Dakotas using a specified primary frequency. From a distance of up to 90 miles, the reply frequency is received by port and starboard yagi antennae mounted either side of the Dakota’s forward fuselage. The differential signal enables the navigator to determine whether the tug aircraft is on the correct heading or whether it needs to alter course to port or starboard. The range circles are switched to 0-36 miles as the target approaches and, finally, to 0-9 miles. The port/ starboard indicator line moves closer to a baseline as the intervening distance reduces. Aubrey Pickwoad reported that he thought that the Dakota had strayed too far to port while crossing the Channel and was closer to Le Havre than intended before the course was altered to cross the coast at Ouistreham much as planned. The glider crew would have only had visual information to support this but, although smoke and debris from the Bomber Command attack on the Merville battery still hung in the air, Pickwoad was able to clearly spot the line of surf as they crossed the coast at 1500′. Initiating stopwatches, Pickwoad and his second pilot, Sergeant Watts, timed their flight across the moonlit landscape. A sequence of flashing lights was observed to port and could have been flashing ‘K’ or ‘N’ in Morse (dash-dot-dash versus dash-dot). However, the timing was incorrect so the tug and glider continued south and, after a few seconds, the ‘real’ LZ ‘K’ lights were spotted, also to port. The topography also matched that expected for ‘K’, so Aubrey Pickwoad thanked Morrison and his crew for the flight and pulled the ‘big red knob’ to release the Horsa. German obstruction poles (‘Rommel’s Asparagus’) were expected in the fields and Pickwoad flicked-on the Horsa’s landing lights at 100′ to guarantee his clear landing. After a 22:50 take-off from Blakehill Farm, Pickwoad’s glider was safely on the ground at LZ ‘K’ at around 00:53, D-Day, 6th June.

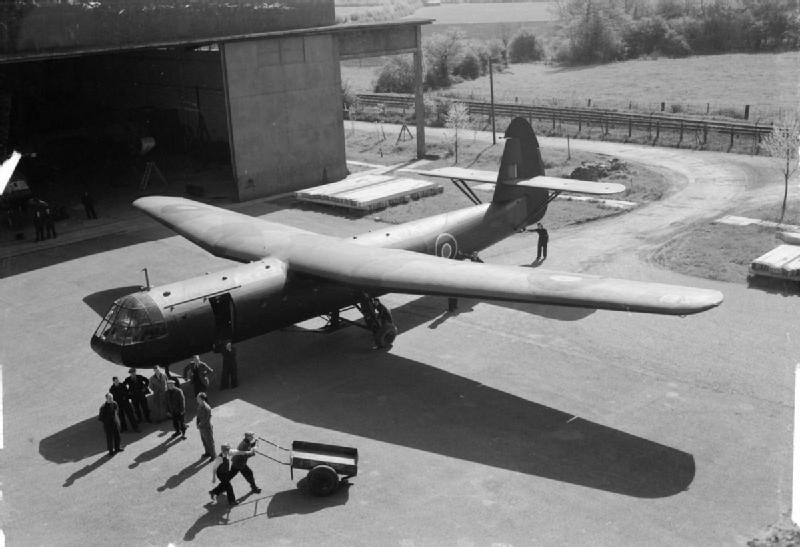
Chalk # 220 piloted by Staff Sergeant R.Banks (1) had been seen by Aubrey Pickwoad as he made his final approach and the second Horsa also made a successful landing around 100 metres astern. This glider also contained three sappers with a jeep and trailer plus explosives and engineering hardware. With both gliders fortunate to land safely, the next struggle was to extricate the hardware from the aft end of each Horsa. The jeeps and trailers would have been loaded via the large cargo door immediately aft of the cockpit but unloading the freight involved removing the four locking bolts securing the tail and then ‘simply’ removing the entire tail section. In practise, this proved more difficult than in theory and it took 30 minutes of brutal persuasion before the tail swung open.
Chalk # 221 piloted by Staff Sergeant W.England and Sgt J.Graham experienced the same kind of problems removing the tail of their Mk 1 Horsa once they had landed. Subsequent airborne operations were able to opt for the Horsa Mk 2 which had a much-improved unloading system following hard-won experience gained in battle conditions during Operation Husky in 1943. Bill England, in Chalk # 22, had made a safe landing but at LZ ‘N’ to the east of Ranville rather than ‘K’ which was a couple of miles to the south. He decided to enlist some mechanical help with the recalcitrant Horsa tail and went to borrow a motorcycle, presumably from another glider. Along the way, he ran into a German patrol at Herouvillette (2), a village between LZ ‘N’ and LZ ‘K’. The Wehrmacht troops opened fire and England crashed off the bike with a bullet wound in his knee. In a partial improvement to his luck, the German patrol was, in turn, captured by British paras and the glider pilot repatriated to Britain.
(1) Most of the post operation comments and data are from ‘One Night in June’ by Kevin Shannon & Stephen Wright published by Airlife Books.
(2) While post-battle accounts tend to refer to Herouville, the name on the map is Herouetteville.
(3) Some historians have suggested that Ridgeway and Foster crewed Chalk #221 and that they landed well south of LZ ‘K’ at the area of La Vieille Eglise, just north of Vimont. This theory would have Chalk # 219 piloted by England and Graham landing at LZ ‘N’ . The photo of the Horsa at the following link is reputed to be Chalk # 221 and it has clearly been able to separate the tail section. It is unknown (by this author) as to whether S/Sgt Ridgeway’s crew achieved this before capture.

The mission of the 8th Battalion of the Parachute Regiment engineers carried in the gliders towed by 233 Squadron was to join with paratroops dropped on DZ ‘K’ and destroy three bridges over the River Dives and the Divette before dawn (05:20) on June 6th. This was to protect the eastern flank of the beach head. There should have been a total of 610 fighting men under the command of Major Tim Roseveare, but only 140 troops and the two gliders landed on, or very close, to LZ ‘K’. Upon landing by parachute, Roseveare himself didn’t recognise the topography as being close to ‘K’ but he could hear gunfire from the south-west. The sappers job was to gather men and munitions in the jeeps and, protected by infantry, dash to the bridges at Bures and Troarn. However, after forty minutes, Roseveare had only gathered six officers, forty other ranks and twenty infantry, none of them officers. They seem to have had adequate explosives and trolleys to move them but none of the jeeps; these must have been still with the gliders at ‘K’ and ‘N’ while the paratroopers were at neither LZ. Nonetheless, Roseveare set-off and shortly came to a crossroads which, helpfully, retained a signpost. This confirmed that they were some two miles too far north – not a lot in flying time but a problem for troops on foot. And then….Salvation! The No 2 Section Para Field Ambulance and trailer from Laurie Weeden’s Horsa at Landing Zone ‘N’ appeared out of the dusk. Nothwithstanding the complaints of the medical orderlies, the sappers commandeered the jeep and, with daylight approaching, offloaded the medical stores at a nearby timber mill. Roseveare despatched the majority of his force to march cross-country to the road and rail bridges at Bures. He then loaded an officer, seven men and General Wade explosive charges onto the jeep and trailer and, taking the wheel himself, headed for Troarn. But luck was still elusive, the heavily-laden jeep would hardly reach 35 mph and, approaching a railway level crossing, they ran into a barbed wire entanglement across the highway. The German guard made a swift exit but it still took 20 precious minutes to disentangle the vehicle. Eventually, the jeep approached the main road at the edge of Troarn and the Major sent two scouts on ahead. After a scuffle with a German soldier on a bike, the advance party shot him with a Sten gun – completely destroying any element of surprise.
Troarn was occupied by German forces but the jeep full of eight soldiers had to drive down the mile-long main street to reach the bridge on the opposite side of town. Withering fire from houses and shops on either side of the street was returned by the British Bren and Sten machine guns as the jeep and trailer gathered speed, snaking downhill towards the target. The bridge was found to be unguarded and thirty-nine charges were hastily set. The 20′ bridge centre section was successfully blown right on 05:20 and the jeep driven up a cart track and abandoned just as the sun began to rise. Concerned that they had under-achieved, a party commanded by Sergeant Shrubsole returned at midday to destroy a second span of the bridge. A couple of kilometres further north, the sappers under the command of of Captain Tim Juckes had reached the road and rail bridges at Bures-sur-Dives around 06:30. They demolished the bridges around 09:15, successfully completing the objectives of the 8th Battalion (3) (4).
(3) Extra detail from the magazine ‘After the Battle’ Vol 1, #1.
(4) Following the bridge demolition at Bures, Juckes’ party then turned its attention to trying to recover a jeep and trailer from Horsa Chalk # 102 which had crashed into the River Dives immediately to the south of the rail bridge. The glider was resting with its nose on the western bank. the second pilot had suffered severe fractures and two of the three gunners had injuries.


Meanwhile, the glider pilots……..
Having freed the ambulance jeep and trailer to head-off on its adventures, S/Sgt Weeden joined-up with a party of paratroops and, followed by a large white horse, they departed LZ ‘N’ en route to the village of Herouetteville and their rendezvous point. Under Weeden’s command, the column struck out across country into the cover of the Bois de Bavent. Eventually, the reached the Escoville to Troarn road and subsequently joined other members of 14 flight at the timber yard (possibly the one where the supplies had been unloaded from the medical jeep).
Lt Pickwoad’s experience from his LZ ‘K’ location was much the same, after freeing the aft door and the jeep cargo, he joined-up with paratroops heading for the rendezvous at the wood ( Bois de Bavent?). The column encountered pockets of resistance along the way which added both prisoners and wounded to the group. By the following day, Pickwoad had met up with eight fellow glider pilots. The plan was for them to travel to the beaches for repatriation to Britain; in the interim, they were assigned 150 German prisoners for escort to the Divisional HQ. Arriving at the coast, the Beachmaster allocated the pilots to appropriate landing craft and they began their return journey to England.
Hits: 769